
Not sure how to set up your gel blaster? I completely relate; my first encounter with it left me scratching my head too. I had no idea that the feed neck needed to sit snugly between the hopper and the gun. Especially if your gel ball blaster arrives with an assortment of attachments, it can look like a bit of a puzzle.
But here’s the good news – assembling and disassembling a gel blaster becomes a breeze once you wrap your head around the different components and their functions.
While the exact bits and pieces might vary from one blaster to another, a basic understanding should be enough to help you put together and dismantle any Orbeez gun you get your hands on.

How To Assemble A Gel Blaster? A Step-By-Step Guide
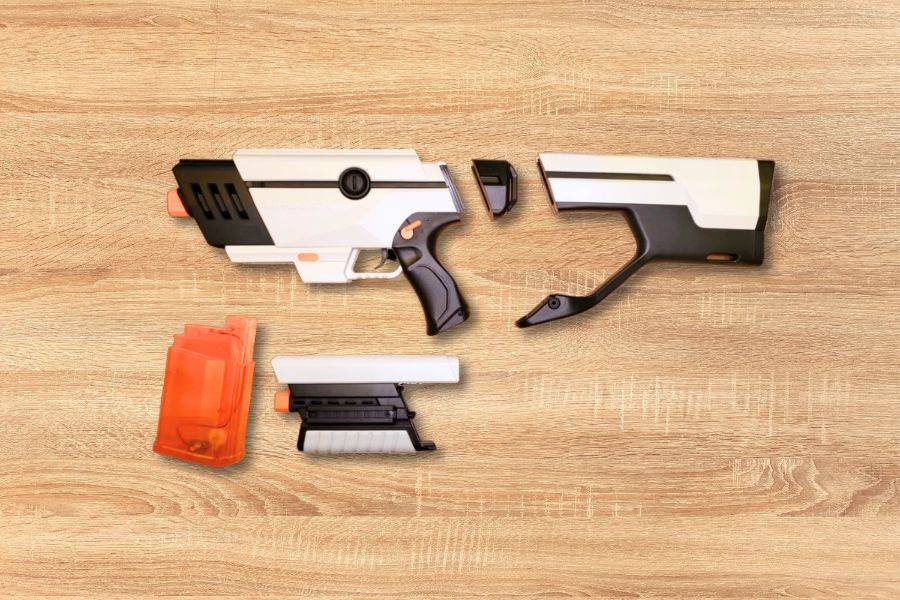
So, you’ve got your hands on a gel blaster, and now you’re faced with a box of mysterious parts. Let’s say it’s an M416 blaster– in addition to the gun, you’ve got the magazine, stock, attachment rail, and maybe even an aiming attachment or scope.
I am using my UnlocX 4-in-1 blaster gun (full review here) to demonstrate the step-by-step process of assembly. But, fear not, this is more or less the same for any gel ball blaster- TESTED AND VERIFIED.
Step 1: Check Out The Components
Begin by giving the components a thorough once-over to understand what you’re dealing with. Keep in mind that installing a top-fed hopper is different from setting up a drum mag, or a clip magazine.
Additionally, some gel blasters house the battery internally, while others might require manual battery insertion.
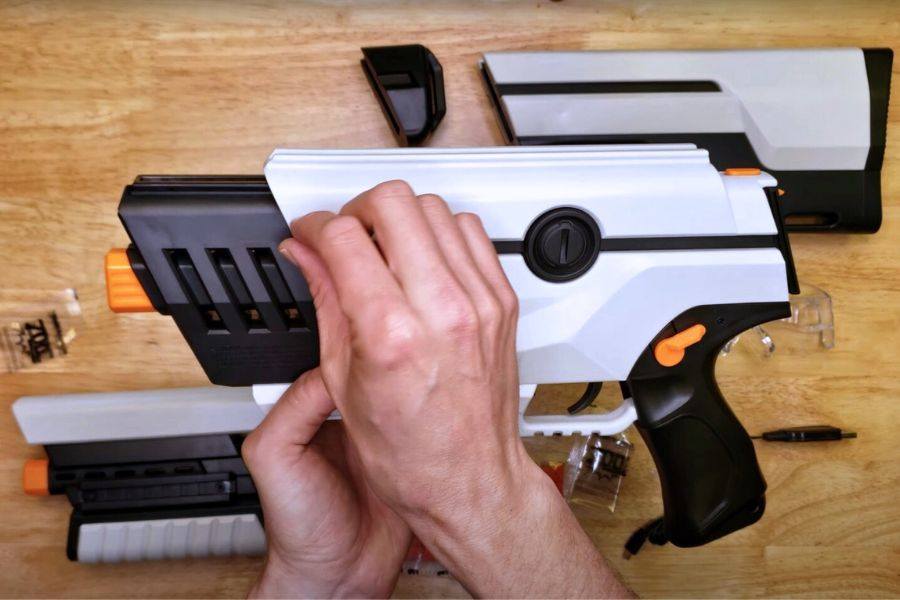
Step 2: Put Them Together
Many Orbeez guns I had the chance to try out, offer removable stocks and other customizable components. In fact, my Nerf Gelfire Mythic even sports a detachable barrel!
You can leave these extras in the box if you prefer to keep your gun compact and lightweight. Personally, I opt for the stock as it provides extra stability when I’m taking shots.
Now, here’s where it gets interesting – the way these components assemble and lock in can vary. For instance, the buttstock on my UnlocX gel blaster utilizes a lever that requires pushing to unlock and detach it from the gun. On the other hand, the Gelfire Mythic’s barrel can be easily slid into position.
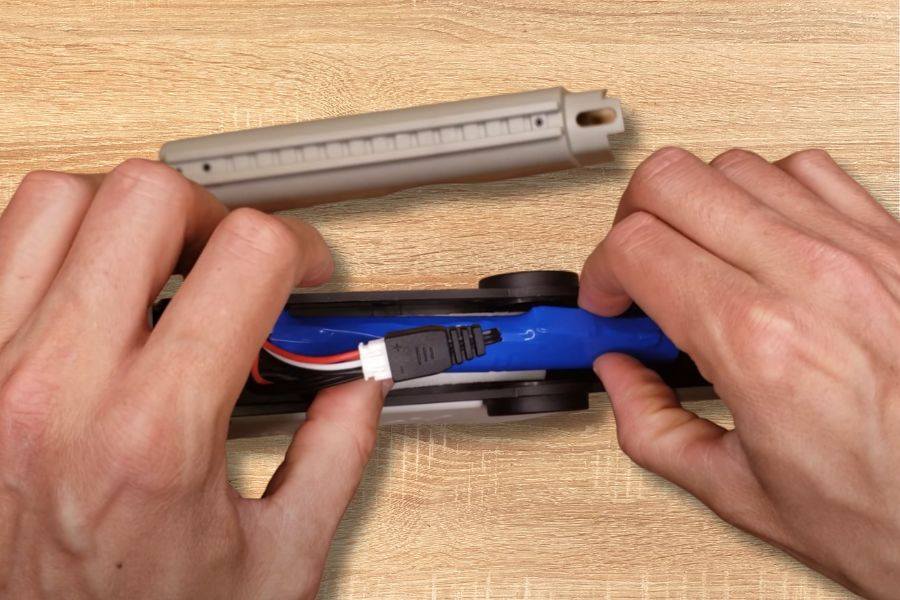
Step 3: Insert The Battery
Here’s where things get a bit electrifying with gel ball guns. When it comes to batteries, the game varies depending on the model. Some blasters contain fixed, built-in cells, while others offer removable batteries, and a few might even require you to take them out for charging. If your toy doesn’t come pre-loaded with a battery, well, that’s your next step.
Now, how you insert that battery can be a complex process. In splat guns with USB charging, it’s often as simple as sliding the battery into its designated chamber, and you’re good to go. Here is a more detailed guide on the charging process.
However, the batteries that need to be charged separately have a couple of wires with connectors on the end – they need to be paired with the blaster’s wires. Just remember, it’s all about matching up those cable colors, like solving a colorful puzzle!
When it comes to the specifics, it’s always wise to refer to the manual for detailed instructions on the battery set up.
Take my M4A1 gel blaster, for example – its battery goes into a buffer tube that snugly fits inside the buttstock. I have to thread the gun’s wires through a chute, lock it in place, slot in the batteries, and connect those connectors. Finally, the buttstock takes its place, neatly covering the chute’s opening.
Step 4: Equip Additional Attachments
Now, let’s talk about adding some extra flair to your Orbeez gun– the ATTACHMENTS AND MODS. Many guns come with a surprise or two right out of the box. For instance, consider my AKM 47 gel blaster; it had this awesome scope that turned me into an instant sniper, providing cover for my team from the shadows. How cool is that?
Most gel blasters have something called an attachment rail, and some even have more than one. These rails are like your gun’s backbone, giving you the freedom to customize. You can install a scope for precision, a holographic/red dot sight for quick targeting, a laser attachment to keep your aim on point, or even a flashlight on the rail for those intense night battles.
All you need to do is mount your chosen attachment onto the rail, slide it into position, and lock it in place. Please keep in mind that the exact process might have a few twists depending on your blaster or the attachment, so don’t forget to give the manual a glance for insider tips.

Step 5: Put On The Magazine/hopper
Now, let’s get into the core of your gel ball blaster – the hopper or magazine. It’s a crucial component that keeps gellets fed smoothly inside, which you need to fit at the inlet. To make the process easier, it’s a good idea to save this step for last. Different blasters have their unique quirks, so it’s important to understand how yours works.
Some guns like the Gel Blaster Surge have top-fed hoppers that rely on gravity to load the gellets to the barrel. Typically, you’ll need to screw the hopper into a feed neck and then slide the entire assembly on top of your toy.
For spring-powered clips or drum magazines, the process is usually simpler. These blasters often feature a button or lever that securely locks the magazine in place once you’ve inserted it. Just be sure to position your hopper or magazine correctly to prevent any jams or damage.
With these steps completed, your gel gun should be ready to go. Put on your protective glasses, power up the blaster, and start having some fun!
Keep in mind that while these instructions cover most Orbeez guns, there might be some unique ones out there, like the UnlocX 4-in-1 modular blaster, with detachable parts that let you switch between different modes.
Also Read: How To Use A Gel Blaster?
Now, What About Disassembling The Blaster?
As you’ve mastered the art of putting together a gel blaster, it’s time to explore the flip side – how to take one apart. Even if you’re not planning on unleashing your inner gearhead with major modifications, there might come a time when your gun needs some TLC or troubleshooting.
So, here’s your step-by-step guide on safely disassembling the different components.
First, Go Through The User Manual
Before you dive into the deconstruction process, take a moment to consult your user manual. It’s like your blaster’s secret handbook, revealing any specific details you might have missed.
Pay close attention to any screws, bolts, or cleverly hidden levers/buttons that need unlocking as you delve into the internal components.
Oh, and don’t forget to peek at the warranty policy – it’s a wise move to weigh the risk of potentially voiding the warranty against your DIY ambitions.
Next, Turn It Off And Remove The Battery
Before you embark on the next step, ensure that your gel blaster gun is switched off. The last thing you want is an unexpected discharge while you’re amid your tinkering. Unless you’ve got some testing in mind before reassembly, it’s a smart move to remove the battery (if it’s removable) for added safety.
Take Apart The External Parts
Now, start dismantling all the external components, mirroring the order you followed when assembling your gel ball blaster. Your magazine or hopper should be the first to come off, followed by any attachments or optional mods.
Next, depending on where that battery is snugly nestled, you might need to peel away a few more components before it’s accessible.
After That, Unscrew The Bolts
It’s time to roll up your sleeves. Grab those trusty Phillips-head screwdrivers because they’ll be your key to unlocking your gel blaster’s internal components. Carefully unscrew those bolts, and remember their positions, especially if they vary in size.
Once you’ve done that, removing the panel that these bolts held in place will reveal the heart of your blaster.
Next, Separate The Components
Let’s gently separate the components to access the important stuff. In some of the bigger M416 Orbeez guns, you can detach the barrel completely from the rest of the body. If you’re disassembling the blaster to deal with a blockage, focus on the barrel.
But if you’re not feeling too confident about intricate electronic components, it’s okay to skip them for now.
Finally, Disassembling The Motor And Other Moving Parts
If you’re tackling a wiring issue or replacing components like the motor, gearbox, or anything else, you’ll need to dismantle the moving parts. Proceed with caution and keep a close eye on where each piece belongs.
I once disassembled my SRB1200 splatter ball gun to swap out the motor and nearly had a puzzle on my hands because I mixed up the gear placements. After attempting several times, I now have a crystal clear idea- but it was a lesson to learn.
So, handle the wiring and mechanical connections delicately; you wouldn’t want to accidentally break a connection. Make sure all the components are in working order.
Remember, the process can vary between different Orbeez guns. A Glock 18 gel ball blaster, for example, will be more compact with fewer components compared to an M416 gun.
Important Tips To Set Up A Gel Blaster
Whether you’re setting up your gel blaster for the first time or putting it back together after cleaning, correct setup is crucial. A missed component or incorrect placement can lead to jams or damage to your blaster. Here are some essential tips for setting it up right:
During the assembly or disassembly process of your gel ball gun, always refer closely to the manual to ensure each component is placed correctly.
Maintain a record of every part you remove and replace them precisely where they belong.
Thoroughly secure all components during the process to prevent potential issues such as performance degradation, jamming, or damage caused by loosely fitted parts.
Before embarking on a game, conduct test fires to verify the blaster’s proper functioning, sparing yourself the inconvenience of mid-game malfunctions.
Verify that any replacement components are compatible with the existing ones to avoid undue stress or conflicts within the blaster’s mechanics.
Exercise extreme care when dealing with wiring. Not only should you match wires by their color while connecting, but you should also ensure they are not pinched or excessively bent during reassembly. For instance, in my M4A1 Orbeez blaster, there’s a risk of the battery wire getting caught between the buttstock and the buffer tube if I’m not mindful.
Wrapping Up Your Blasting Adventure
So, that about sums up the essentials, and I trust this information proves valuable. While disassembling and tacking together the parts may pose added complexity in certain cases, the best gel blasters are designed with user-friendliness in mind.
Nevertheless, exercise caution when handling electronic components, particularly if you lack confidence in your expertise. If you encounter difficulties with a new gel gun, especially one covered by a warranty, I recommend reaching out to the seller or manufacturer for professional repair or replacement services.
Your blaster is a sophisticated toy, and it’s best to leave intricate repairs to the experts.
